 |
| From blacksmith to gentleman. |
a strip of paper, and revert it back by pushing it in. I was so fascinated that I designed a
- a pair of scissors,
- a glue stick,
- the printouts!
 |
| This version displays on the front and back Wemmick's house. Download: https://drive.google.com/file/d/1Ov5V9l-_Ia_eATBYxdQ-5kZJdic1dOpV/view?usp=sharing |
 |
| This version displays Mr. Jaggers telling Pip that he has "Great Expectations". Download: https://drive.google.com/file/d/144iiVHJsQimpwNIiOwyIe3qOW7GL2KMJ/view?usp=sharing |
 |
| This version displays my very first illustration: The convict holds Pip above a gravestone. Download: https://drive.google.com/file/d/1_G8-9ua38kyPVgG8sqo32aC2T7FZkYNC/view?usp=sharing |
 |
| PLUS: For the Wagnerians among you: This transformation card shows the hero of Der Meistersinger von Nürnberg Stolzing, and the antagonist Beckmesser. Download: https://drive.google.com/file/d/1oKTzTittE5TGIaJHxrof6QBKbZBXQzUs/view?usp=sharing |

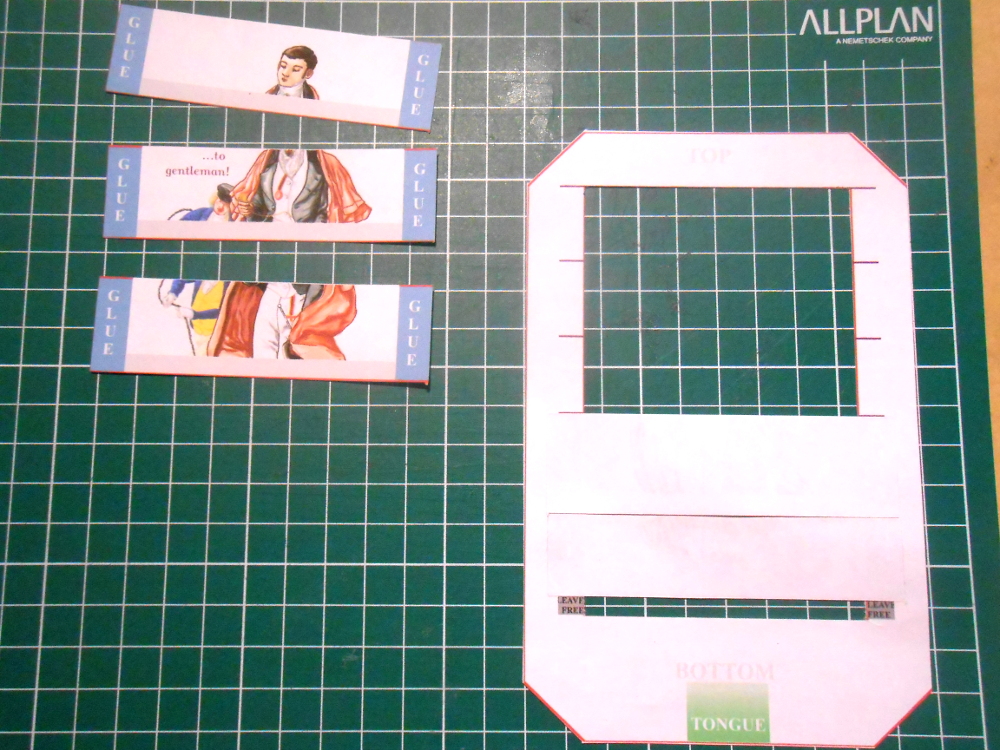
STEP 1: Cut out forms.

STEP 2: Glue GENTLEMAN CARDS onto FRAME:
Take the FRAME, and start from the bottom: Take the card with Pip's feet,
and put it above the LEAVE FREE grey bar, and under the first purple marks, so
that the LEAVE FREE bars enclose a free space.


Glue the GLUE sides of the card onto the FRAME, so that on the other side of
the FRAME only the image becomes visible.
Proceed with the next card (the card upper to Pip's feet). Position the card
under the second purple marks. The light grey area overlaps with the previous card.


Glue the GLUE sides of the card onto the FRAME.
Do the same with the rest of the cards.
At the end, Pip's gentleman figure should be on full display on the other side of the
FRAME.


STEP 3: Slide BLACKSMITH CARDS into slits:
Start again from the bottom with the feet's BLACKSMITH CARD.
Slide the card inside the LEAVE FREE opening, so that the picture appears on the front of the FRAME, while the GLUE strips stay outside on the back of the FRAME.
Do the same for the rest of the cards.


STEP 4: Glue BLACKSMITH CARDS together:
You'll see that all the GLUE strips of the BLACKSMITH CARDS overlap each other.
Now you'll have to glue them together.
Start from the bottom, and work your way up. Make sure you don't glue them on the FRAME, or onto the GENTLEMAN CARDS.
Now, by carefully moving the lower card in and out, every other card repeats the motion.


STEP 5: Glue TONGUE on the back of BLACKSMITH CARDS:
Fold the TONGUE along its long middle axis, so that the picture on the bottom appears on both sides of the TONGUE.


Glue TONGUE on the inside together.
Align the TONGUE on the long middle axis of the FRAME.
Glue the white side of the TONGUE on the backs of the BLACKSMITH CARDS, which hang above the GENTLEMAN CARDS.
Now, by moving the TONGUE, all BLACKSMITH CARDS do the same.
STEP 6: Glue FRAME on CASE:
Fold CASE along middle axis, so that it forms a booklet.
Fold folds of front page onto back page.


Open CASE, and put FRAME in it, so that the picture is visible on the front of the CASE.
Now, glue the front side of the FRAME onto the inside of the front CASE.
Close CASE, and glue folds onto back of CASE.

STEP 7: Congratulations!
Now you've got your Great Expectations transformation card.
You can write something on the back, and send it to your friends or loved ones!

Great work!
ReplyDelete